A Helpful Guide on using Jupyter Notebook for Scientific Documentation - Part 1 - Jupyter Lab
This is Part 1 of the series on Jupyter Notebooks for Scientific Documentation. This article presents you an introductory information about JupyterLab and its capabilities. See Part2 to learn about Markdown language and useful Markdown syntax. See Part 3 to learn about LaTeX typesetting in Markdown and useful LaTeX syntax.
Introduction
Jupyter Notebook and JupyterLab are open-source web-based applications developed by Project Jupyter. Jupyter Notebooks are documentation-centric whereas JupyterLab is a development environment. According to the official webpage,
JupyterLab is the latest web-based interactive development environment for notebooks, code, and data. Its flexible interface allows users to configure and arrange workflows in data science, scientific computing, computational journalism, and machine learning.
The Jupyter Notebook is the original web application for creating and sharing computational documents. It offers a simple, streamlined, document-centric experience.
Benefits of using Jupyter Notebooks
- It is a web-based application that runs on any popular browser.
- You can easily combine text, graphics, audio, and video in your documents.
- It allows you to document conveniently using markdown syntax for plain text formatting and LaTeX typesetting for mathematical formatting.
- JupyterLab can be used as a rapid prototyping tool.
- Interactive coding functionality allows you to write, execute, and debug codes quickly.
- It is an efficient tool for preparing and sharing lecture notes for interactive teaching.
- It lets you effectively share your research results.
- It ensures reproducibility.
- It can be conveniently hosted through GitHub or on your website.
JupyterLab is my first choice tool to prepare and share documents and tutorials of my open-source package with the users.
If you are convinced that JupyterLab is for you, please read the next sections for the installation steps and to make yourself familiar with the JupyterLab interface.
Installation
Follow the steps below to install JupyterLab and other libraries that we will be using in this article series. The installation procedure suggested here is for Windows OS. If you are working on other operating systems or environments, please see the installation instructions on the links provided below.
-
Install Python from here.
-
Install
pipby following the instructions given in the webpage here. -
Install IPython by entering command
pip install ipythonon the terminal. -
Install JupyterLab using command
pip install jupyterlabon the terminal.
Note. We are downloading Python for installation of PIP only and we will not be using any programming language including Python in this tutorial. So, no need to worry if you are not into programming.
Note. Jupyter environment primarily supports Python programming, however, you can use its features with other programming languages too with Jupyter kernels.
Note. IPython is a Python interpreter for Jupyter Notebooks. Read its documentation here to know more.
Info. Visit official Jupyter Installation and Documentation webpages for further information.
An alternate approach is to install Anaconda Python distribution which includes IPython interpreter.
Caution. I prefer the first approach and therefore, I will be not be using conda environment in this article series.
Note. After you have installed JupyterLab, open command terminal on your Windows, change directory to the root directory where you want to start your project and type jupyter lab to start a JupyterLab session on your preferred browser.
Warning. Closing the browser tab will not shut down the kernels. Use Ctrl+C on your terminal to shut down all kernels and terminate the JupyterLab session.
Tip. If you accidentally close your browser, go to your terminal where you started the JupyterLab session, copy the URL that starts with http://localhost:8888/ and paste it into the address bar of your browser to restore your JupyterLab session.
Getting Used to JupyterLab Interface
JupyterLab Launcher
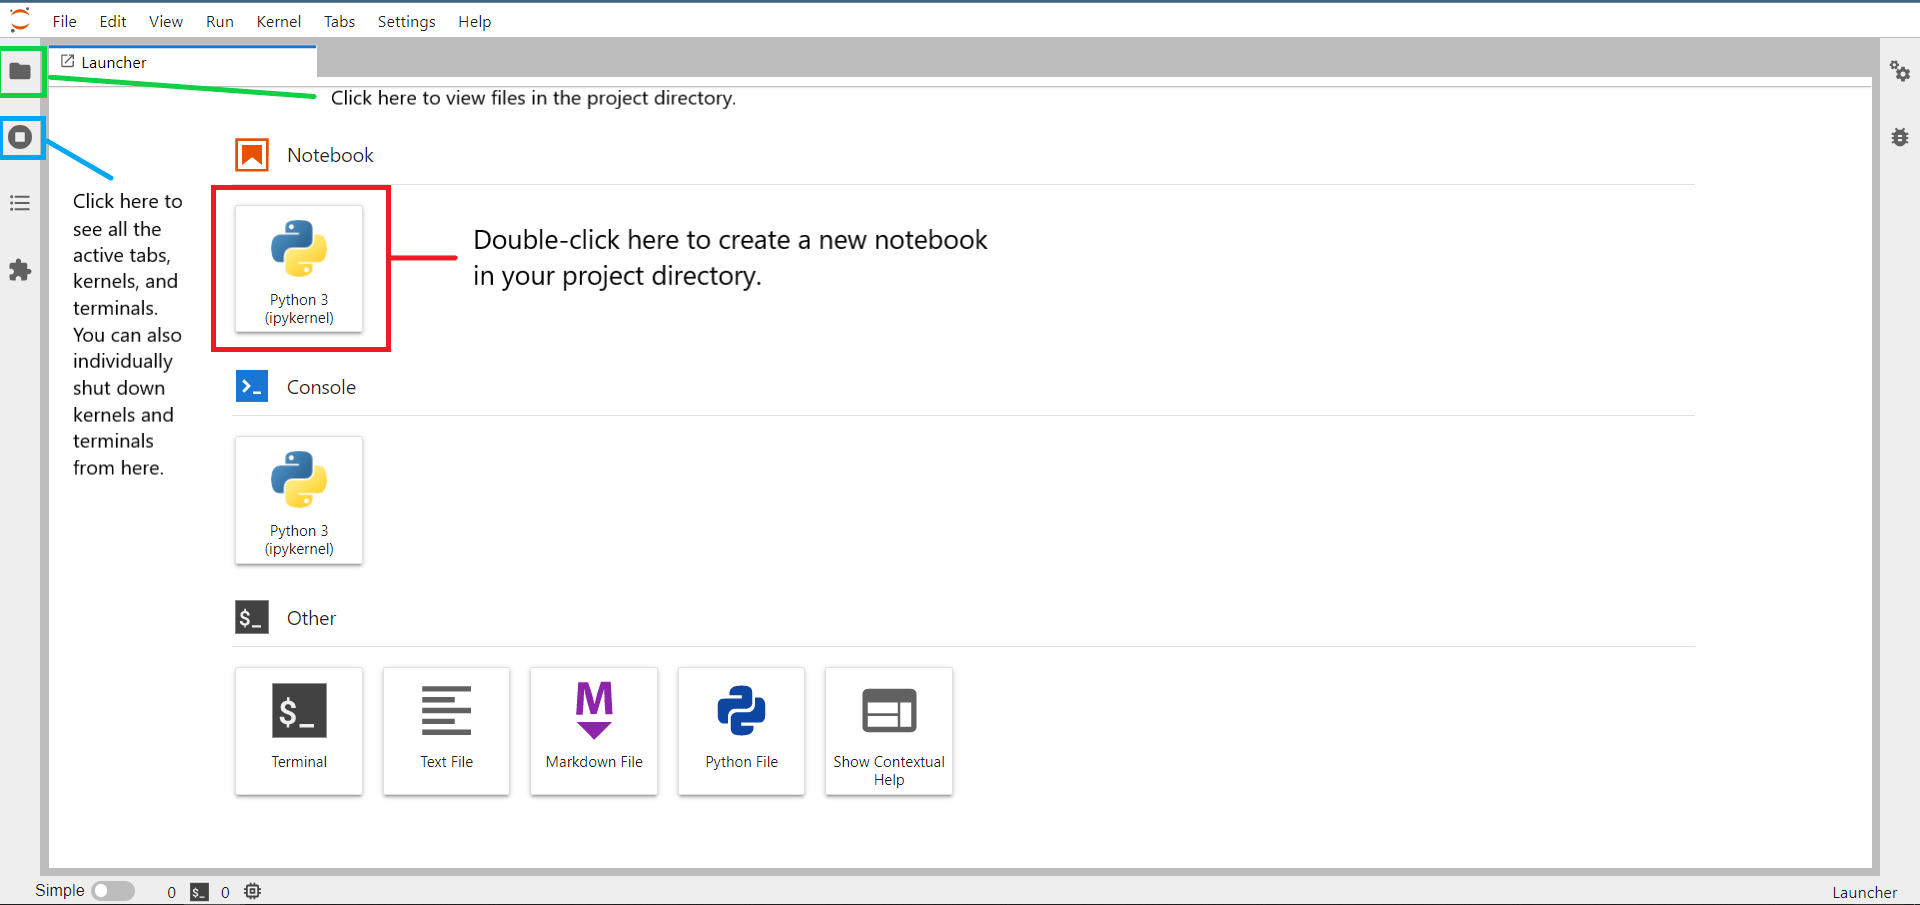
Create a File
Select a file type from the available options on the launcher window to create a new file. A new notebook can be created by clicking on the notebook option (see red box in the above image).
Opening a File
To open a file in the project directory, click on the File Browser (see green box in the above image) on the left sidebar to see the list of files and double click on the filename.
Renaming a File
Go to File Browser, right-click on the filename and use the Rename option to rename the file.
View Active Kernels, Tabs, and Terminals
View all the open tabs and active kernels and terminals by clicking the icon below the file browser, shown by blue box in the image above. You can shutdown the kernels and terminals from here.
Notebook Interface
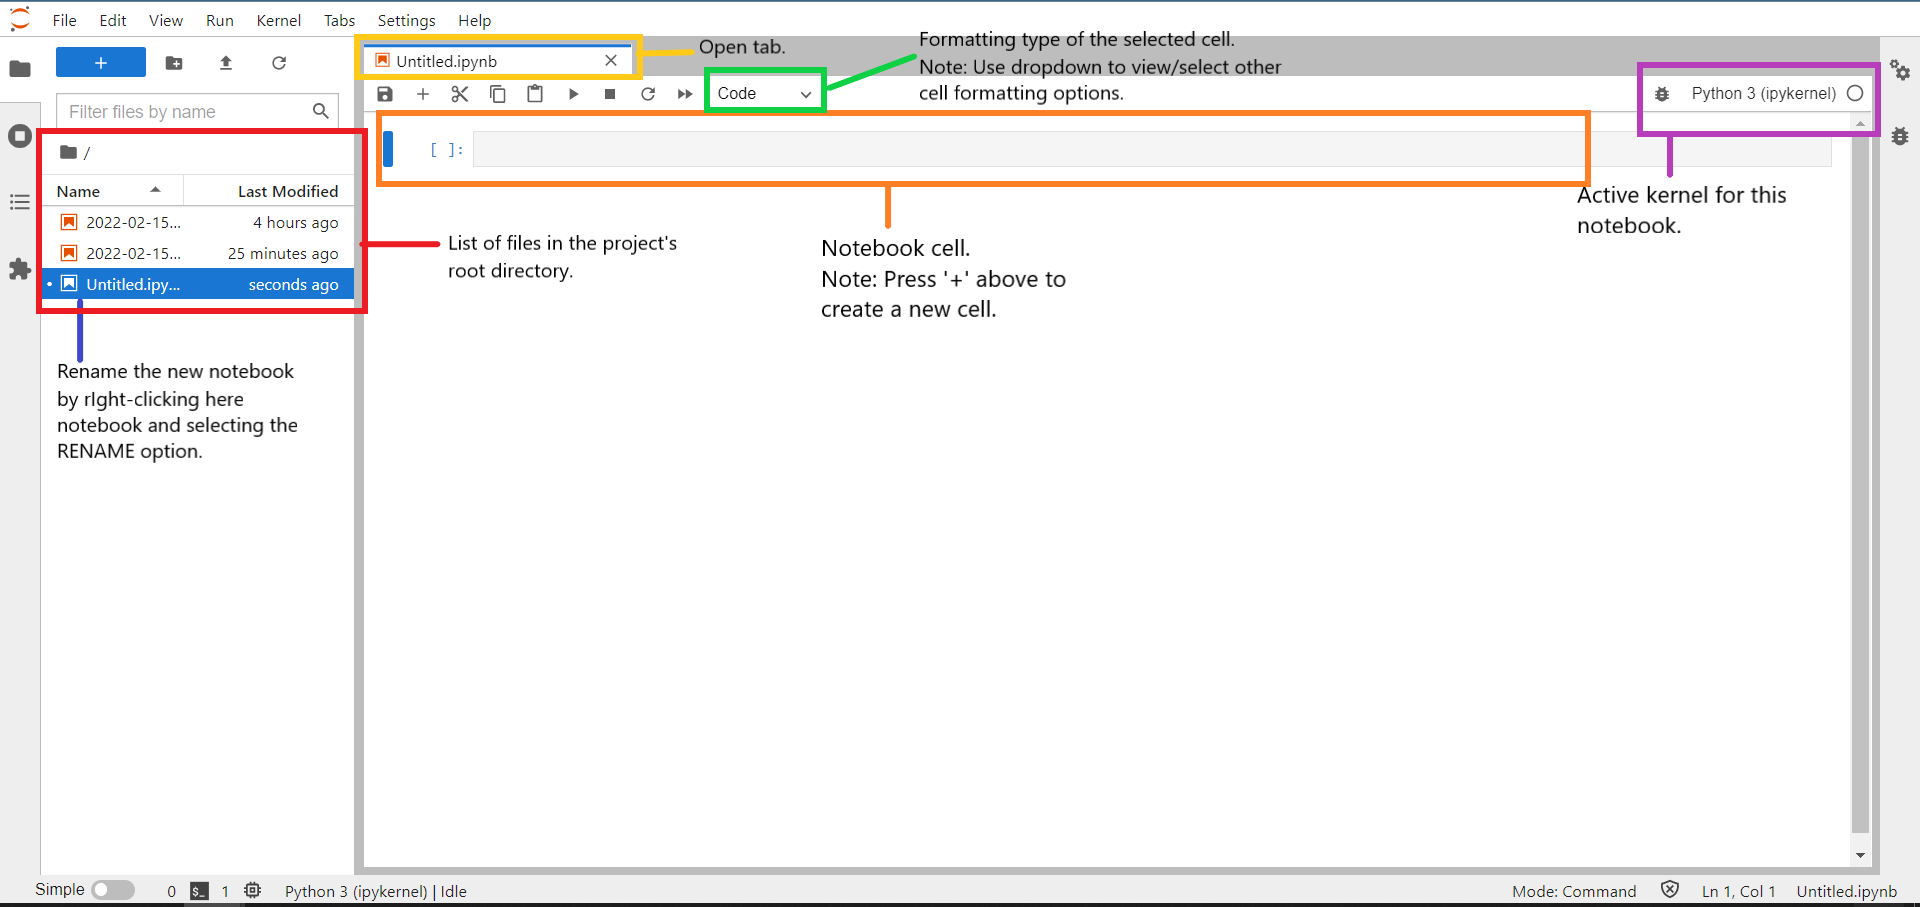
Cells
Cells in JupyterLab environment are the places where you add plain texts, code statements, images, videos, HTML, and LaTeX expressions. (See orange box in the above image).
Cell Types
Notebook allows three types of cell formatting - Code, Markdown and Raw. Code cell type allows you to write and execute code statements in the programming language of the active kernel. With markdown cell type you can write text in markdown syntax using all markdown formatting features. In a markdown cell, you can also use LaTeX syntax to write mathematical equations in your notebook. With raw cell type you can add markdown and LaTeX texts, however, the contents will not be rendered until you export the document in the desired format.
Note. Default kernel is Python.
Tip. Press Shift+Enter to execute the code statements or to render the markdown text in the selected cells.
Change Cell Type
To change the cell type, select a cell, click on the dropdown box (see green box in the above image) and select a cell type from the list.
Change Kernel
To change the kernel type, click on the active kernel (see purple box in the above image) and select a kernel type from the list.
Tabs
All open files will appear as separate tabs on the interface. Tabs let you switch between different open files. In the image above, there is only one open tab.
Modes
There are two modes through which you can work with cells - Edit mode and Command mode.
Edit mode lets you add/edit the contents of the cell. When you are in edit mode, you will see a caret inside the cell and the cell border is of blue-ish color (it may be green or blue on your computer). Command mode lets you perform notebook actions such as copy cell, run cell, delete cell and other options. In command mode, you will not see a caret (text cursor). In the image shown above of the notebook interface, the cell is in command mode.
Frequently Used Menu Items
Below is the list of menu items that you will be using frequently. Users are encouraged to browse through all the menu items.
New
Go to the File menu, hover over New and select a filetype from the list to create a new file.
Save Notebook
Go to File menu and select Save Notebook to save the notebook.
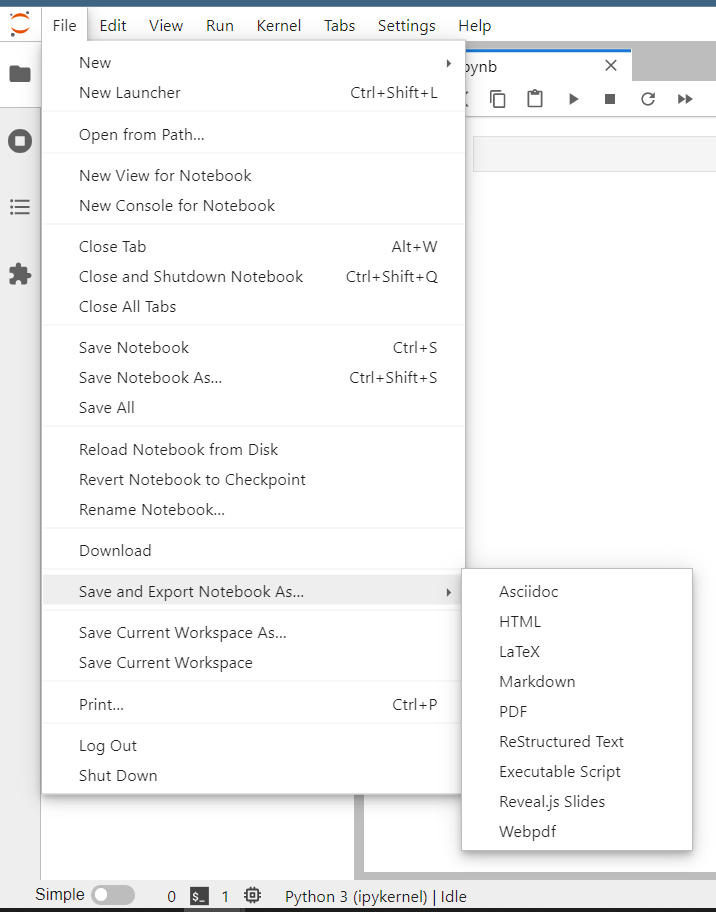
Save and Export Notebook As
Go to File menu and hover over Select and Export Notebook As which will give you the options as shown in the image below to export notebook.
Before exporting your notebook you will need to install the package nbconvert by entering the following command
pip install nbconvert
Instead of using Save and Export Notebook As, I use the terminal command for using nbconvert to convert the notebook to other formats.
jupyter nbconvert --to <output format> <input notebook>
For example, convert a file my_notebook.ipynb to markdown by typing the following command
jupyter nbconvert --to markdown my_notebook.ipynb
Note. To utilize its full functionalities, nbconvert requires additional packages listed on their website.
Run Selected Cells
Go to the Run menu and select Run Selected Cells to execute the contents of the selected cells.
Render All Markdown Cells
Go to the Run menu and select Render All Markdown Cells to render all markdown cells in the notebook.
Run All Cells
Go to the Run menu and select Run All Cells to execute the contents of the selected cells.
Restart Kernel and Clear All Outputs
Go to Kernel and select Restart Kernel and Clear All Outputs to restart the kernel and clear all cell outputs. This is the option that I use the most for restarting the kernel.
Theme
Go to Settings, hover over Theme to view the list of theme options.
Text Editor Theme
Go to Settings, hover over Text Editor Theme to view the list of text editor theme options.
Advanced Setting Editor
Go to Settings and select Advanced Setting Editor to view advanced settings.
Caution. Modifying advanced settings should be performed by advanced users.
Launch Classic Notebook
Go to Help and select Launch Classic Notebook to open the classic Jupyter Notebook interface.
Keyboard Shortcuts
In Edit mode
| Actions | Shortcuts |
|---|---|
| Run cell and select below | Shift+Enter |
| Run selected cells | Ctrl+Enter |
| Select all contents | Ctrl+A |
| Split cell at cursor | Ctrl+Shift+-(Minus) |
| Save and checkpoint | Ctrl+S |
| Undo | Ctrl+Z |
| Redo | Ctrl+Y |
| Move up | Up |
| Move down | Down |
In Command mode
| Actions | Shortcuts |
|---|---|
| Change cell to code | y |
| Change cell to markdown | m |
| Change cell to raw | r |
| Insert cell above | a |
| Insert cell below | b |
| Delete selected cells | d d |
| Cut selected cells | x |
| Copy selected cells | c |
| Paste cells below | v |
| Run cell and select below | Shift+Enter |
| Run selected cells | Ctrl+Enter |
In this post, I have presented only the basic information on JupyterLab that a beginner will require to develop some level of familiarity with this tool. If you like this article, share it with your network. If you have any questions or feedback, share it with me through comments/email. Your comments and suggestions will help me improve my future posts.


Leave a comment